Post by kube1 on Feb 18, 2014 13:33:48 GMT -5
I have been working on this Whip project for a few months and keep a log of my progress on vintagesleds but it seems only right that I keep things posted here as well. Many people have given me a lot of advice and help on this site, and to them I say Thank You. I have compressed my postings up until now into one long post.
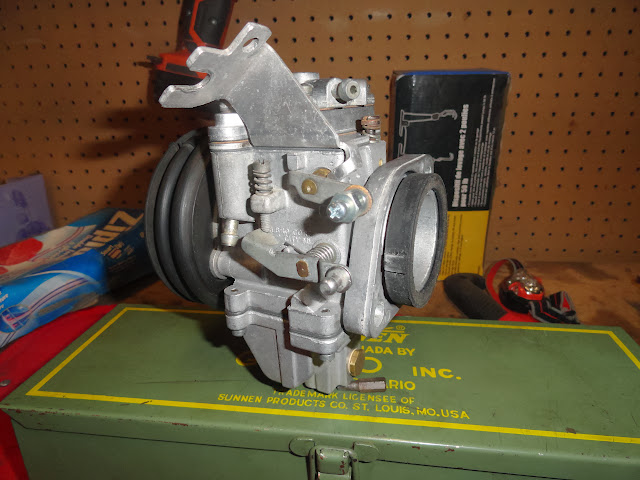
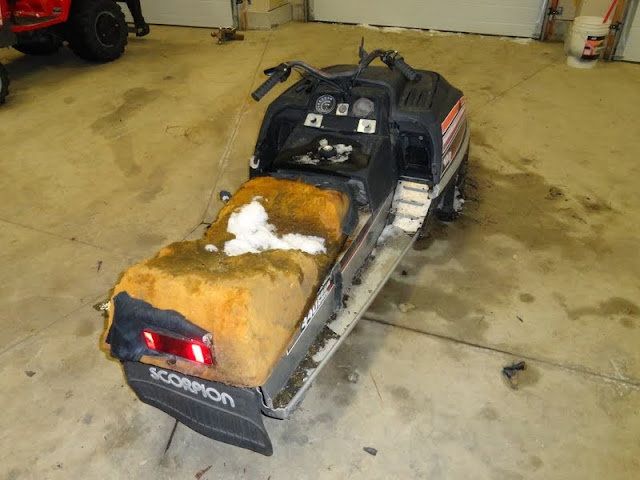
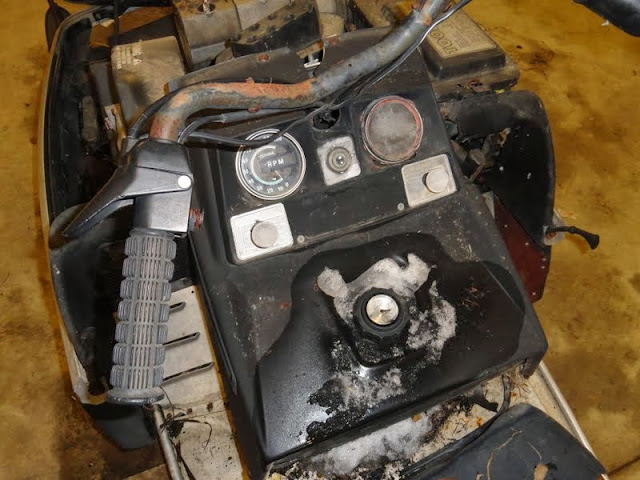
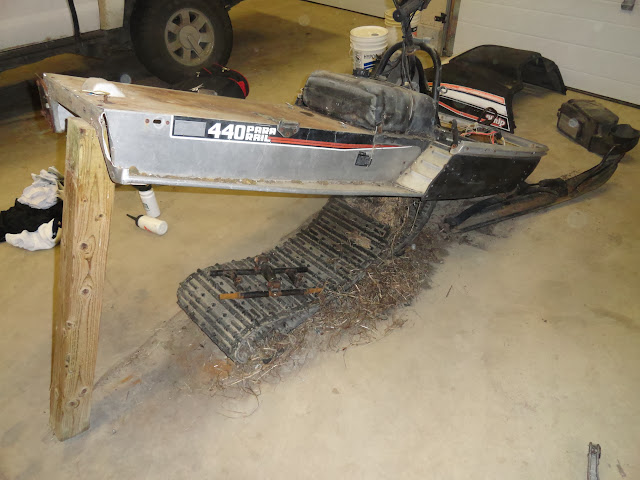
Heres the beast. It's a disaster. The belly pan is a complete write off. Someone has done some renovations on the back of the tunnel as you will see in the photos. The seat is self explanatory. On the hand, the engine is whole, as is the rest of the drivetrain. The track is in rather remarkable shape and the hood is in one piece! I am on the fence as to what to do with this beast, part it out and toss the chassis or go ahead and repair the ass end while searching for another belly pan. The engine is a no brainer. I will start there and rebuild it top to bottom along with the carb. That's easy. Any suggestions? I live near Saskatoon, SK if anyone has any parts to offer. I get regular visits to and from Flin Flon if there is anything up north to be had.


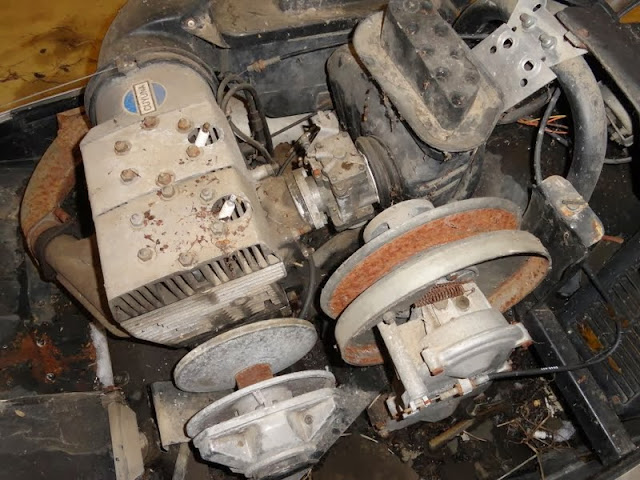
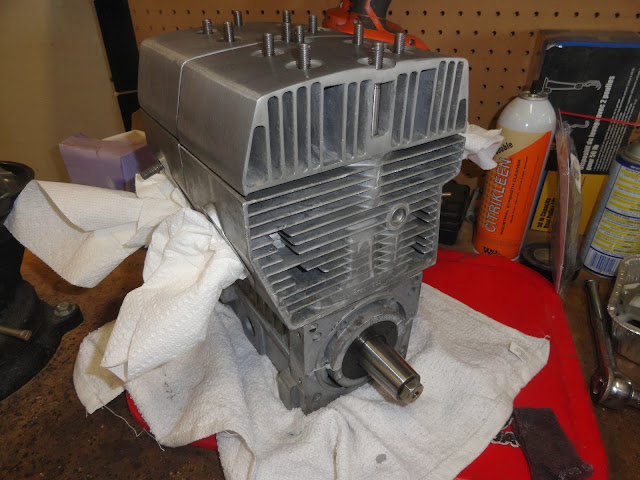
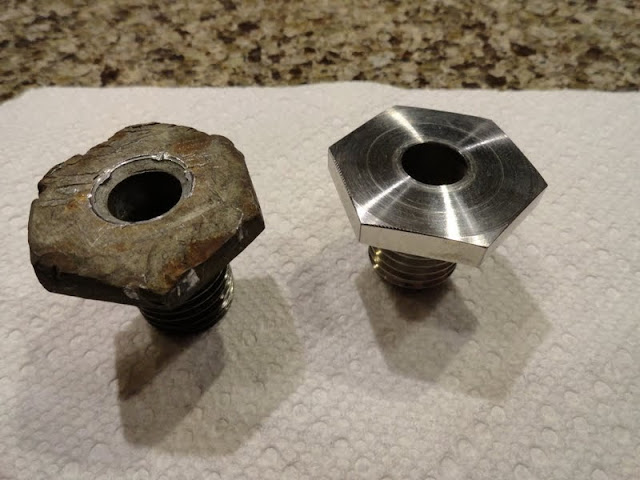
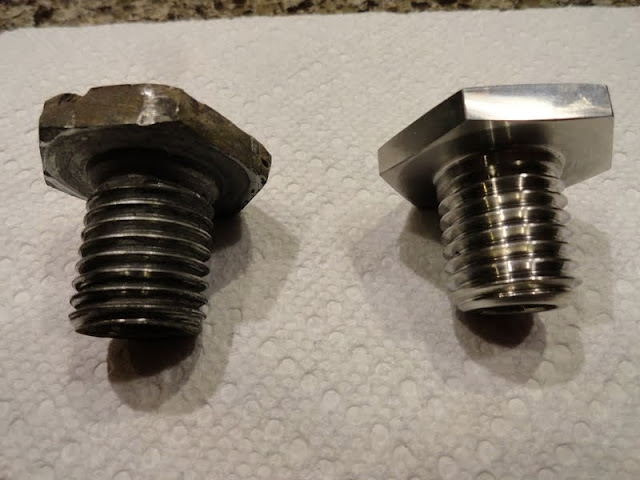
Ok, I've torn down the engine and it looks ok for the most part. The piston and head on the pto side show signs of detonation but nothing major. I'm going to hone the cylinders and put in new pistons anyway. The clutch was a real pain to get off. I could not find specs or drawings or any kind of reference to a puller so I made my own. Its covered in grease because I had to fill the crank hole with grease to hydraulically get it to pop off. The 1.5in. nut on the clutch was in pretty tough shape so I whipped up a new one out of stainless. Should look nice when the rest of the clutch is rebuilt.
Ok, I have decided to use the 1980 as parts and get another sled. It is just too far gone. I am picking up another 1977 this coming Friday to use a base. I will use the 440 from the 1980 as a powerplant and the chassis from the 77. The hood from the 80 will be used as well as anything else that needs to be replaced. I havn't decided on a color yet.


Well I've been working on the engine. The flywheel was a little bit of a chore to remove. I tried the old universal puller method along with a little heat and some taptaptap on the end. It didn't budge. I didn't want to beat the heck out of the crank so I made a puller similar to the one in the Cuyuna service manual. The flywheel popped right off. Yes, that is blood on the puller. Don't ask.

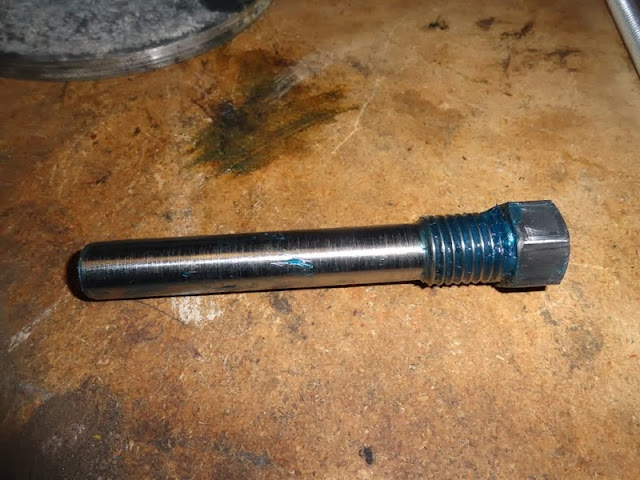
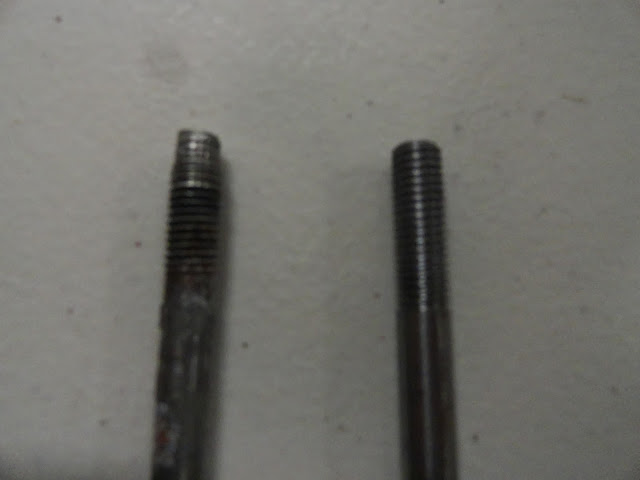
Somewhere in the life of this overused motor some jackass had it apart because of a burnt PTO side piston. He replaced the nuts on a few of the studs with imperial fine thread nuts. They were all cross threaded and ruined. *sigh*
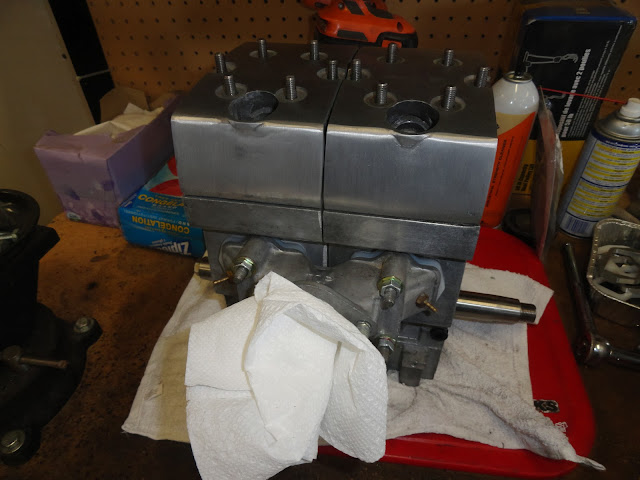
I made all new studs out of 5/16" stainless rod.
One of the exhaust studs was pulled right out of the casting and needed to be helicoiled. That wasn't so bad. I think the center seal on the crank is toast. Its fairly loose on the shaft. I was going to press the crank apart and put a new one on but I have no idea where to get one. Any thoughts? I have another crank from a 340 that should work but I won't know until I tear it down.

Ok, I got the old 340 torn down. The chassis is in pretty good shape with the exception of the skid plate for the chain case. Its kind of beat up but the one on the other sled is in good shape so I'll switch them out.


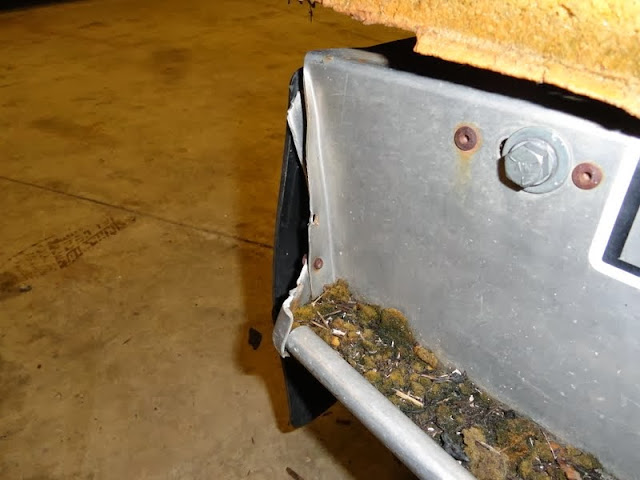
The belly pan is in not great shape. If I can't find another in reasonable shape I will attempt to repair this one. Does anyone know what kind of plastic this is?

Well, it's New Years Eve and I'm laying on the floor in the rec room watching the kid play vids. I havn't made much progress this week. The jugs are in for boring and will be ready on Thursday or Friday. I got the last set of pistons Rec Supply had on the shelf for a Cuyuna 440. I made new studs for the top end as well as a clutch puller for the old 340 so I can get at tearing it apart to retrieve the crank. I noticed a crack in the tunnel that needed welding so I decided to clean it up and see if there were any more. I find a few!! Nothing major though. It'll be going to my uncles shop for a little TIG treatment before reassembly. The best news I got this week was that stingerIII has a complete belly pan for me and maybe a few other goodies to help me along! Thanks stingerIII!!

The motor mounts have hairline cracks.

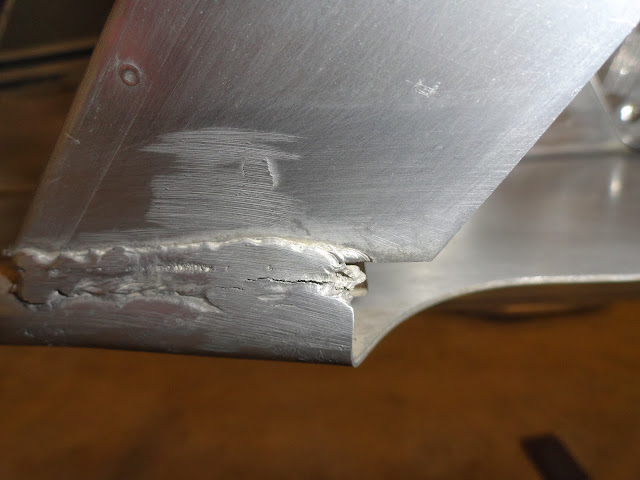
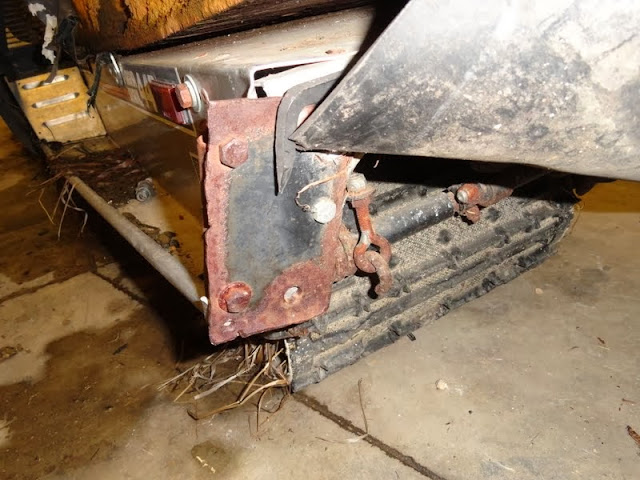
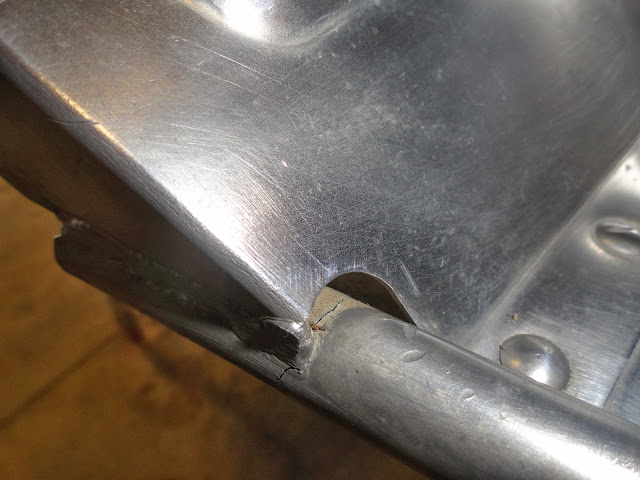
The biggest crack of all. Somewhere along the way something went up inside the tunnel.


Well, its not perfect but it's in pretty decent shape. Just a few dings here and there, most of which disappeared with the tap of a rubber mallet.
I have 2 cranks for the 440 and one had has good bearings and I hoped one would have a good center seal. The center seals on both are pooched. I have had no success finding a seal locally so I am going to use 2 single sided seals back to back as recommended by others. The good news is that the crank needs no repair other than the seal. I was worried that the shaft would need flame spraying in the center but its only worn in the seal area by 0.001. I'll press it back together and realign it this weekend I hope.

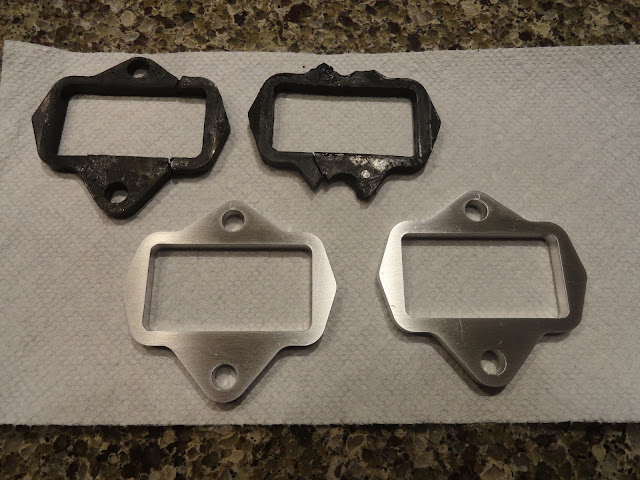
Finally got around to making some intake isolators. The old ones are no good as you can see in the pic.
Today was good and bad. The good news is that chassis is done with getting welded. The bad news is that I was looking at the cylinders and I noticed that one has a crack in it. I don't think I can get away with using it. What do you guys think?
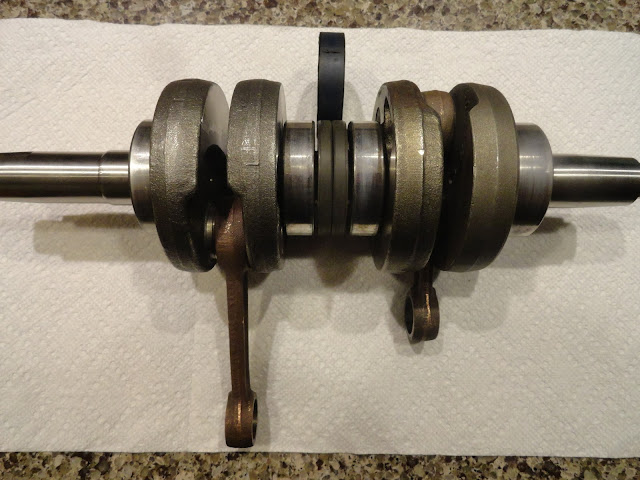
The crank is finally done and realigned. I am glad I did this as there is no comparison between the old center seal and the new ones. It was a real learning curve putting it back together but now that I have done one the next won't give me so much anxiety. In the pic you can see the old seal behind the 2 new ones that replaced it.
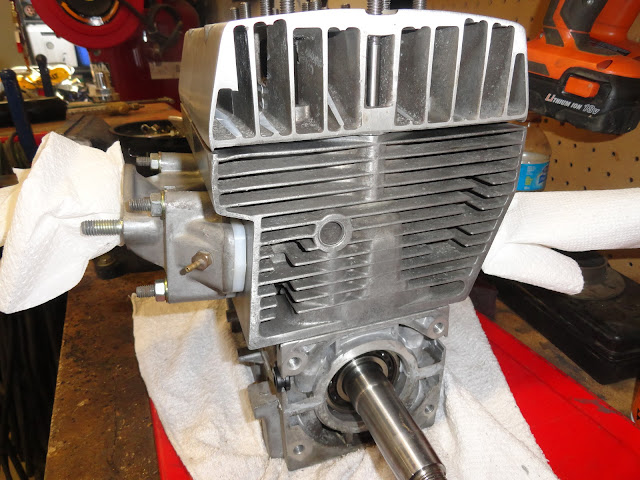
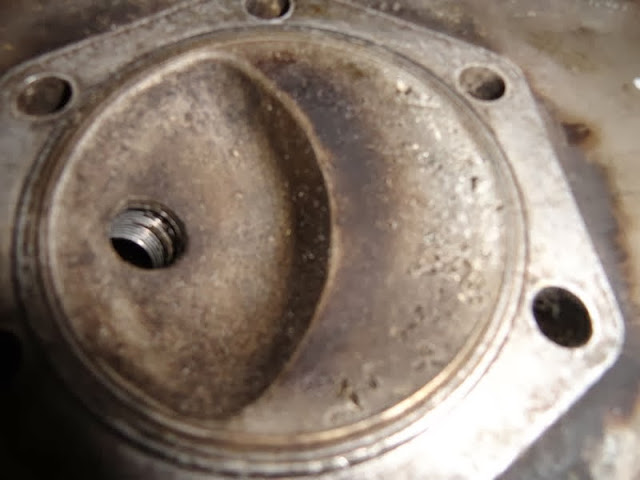
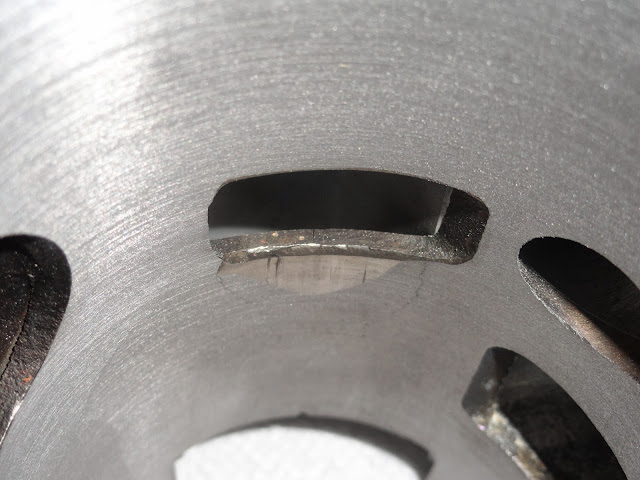
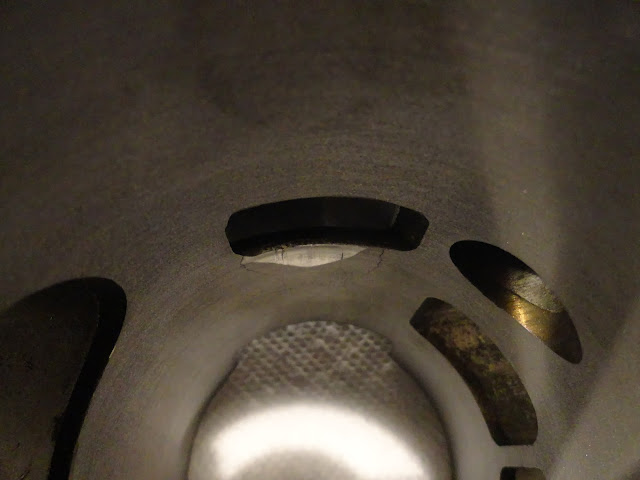
Here is my take on a flow through head for the mag side. As far as I know Cuyuna never made one for the engines with the canted plug design but I don't see any reason this shouldn't work the same way.

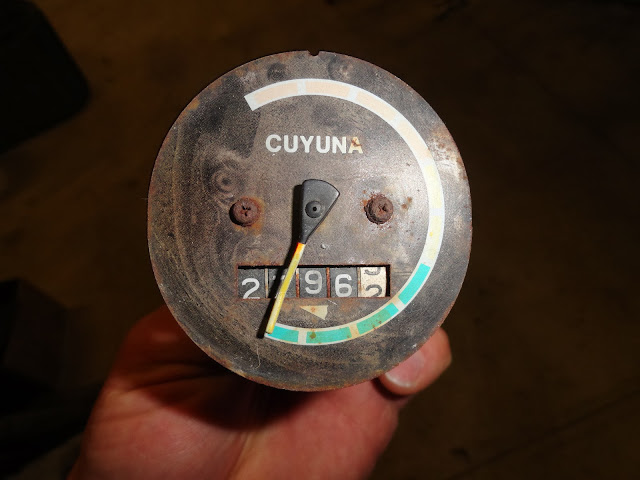
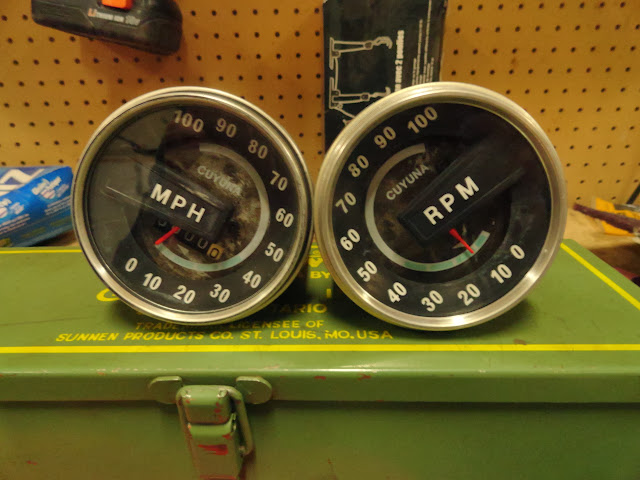
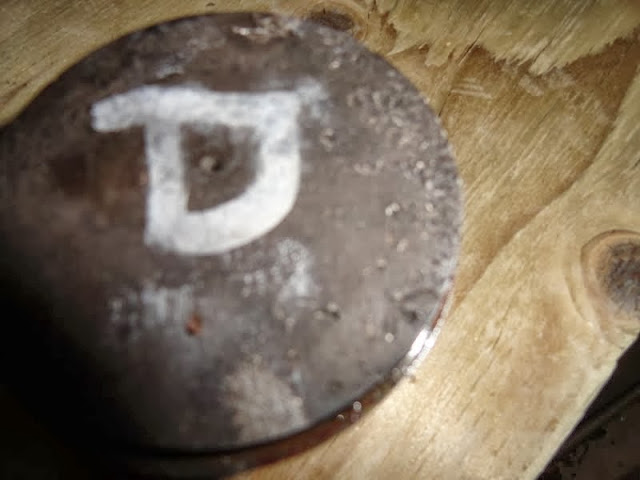
I havn't posted in a while so here is the update. I had planned on starting reassembly by now but I have hit a little roadblock. Turns out both sets of my drive wheels are cracked, and not just a little. I am attempting to source some out close to me as I do NOT want topay US prices right now. Stupid dollar..... If I can't find some in decent shape I will manufacture my own. In the meantime I have made much progress cleaning and refurbing other parts. The chaincase being the worst. Pressure wash, soak in hot tank, repeat as necessary. I have never seen so much dirt/soil inside a machine. You could have planted a garden in this thing. I took apart the guages and cleaned and repainted the insides and needles as descibed here. I also rolled back the odometer as described in this video. The skid is another story. I thought it was in decent shape but someone must have damaged it badly and decided to "rebuild" it themselves. I'll post a pic of it later.
Here's the pararail out of the 77. Some one replaced most of the spacers with pipe nipples that had been cut to length with a hacksaw. Nice. I assume most of the axles are bent too. We'll see.


This spacers in this pic were replaced with some old steel pipe.
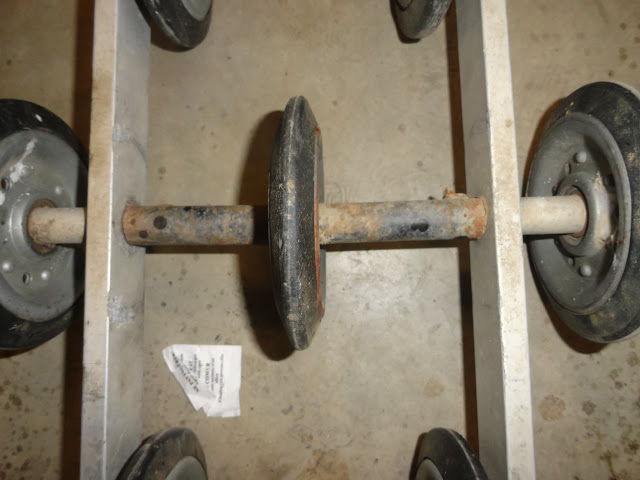
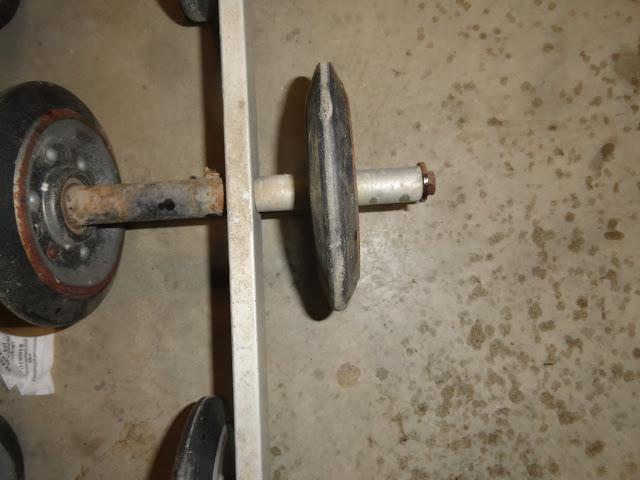
This one has another spacer on the outide of the wheel. I really don't know why.
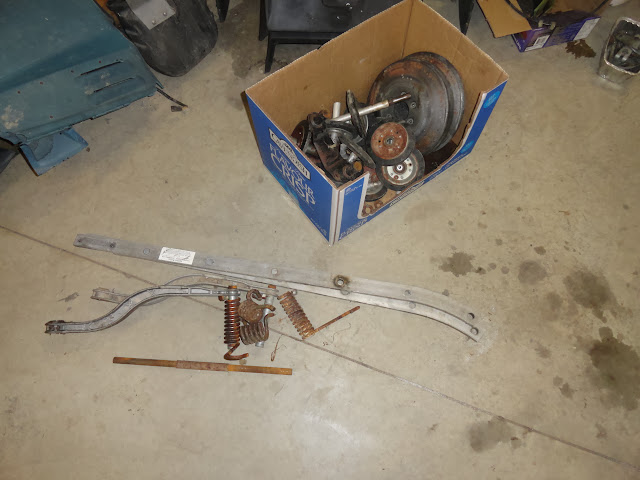
Here is the suspension from the donor machine. It still has the stock spacers but needs new axles.

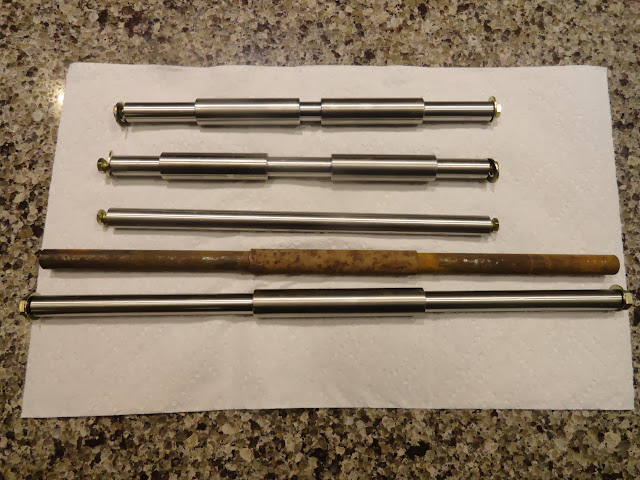
It took some doing but I got it apart. I'm going to make all new axles and spacers since I couldn't get most of them apart.
I think there used to be a heavy duty suspension kit offered for these sleds but I don't know what it consisted of. I'm no spring chicken anymore and the thought of making making new aluminum axles and having them bend again bothers me, so I made new axles and spacers out of stainless.
I got the swing arms cleaned up and noticed that the bronze bushings had shattered on the ends. They were pressed out and new ones were made along with new stainless spacers that ride inside the bushings.

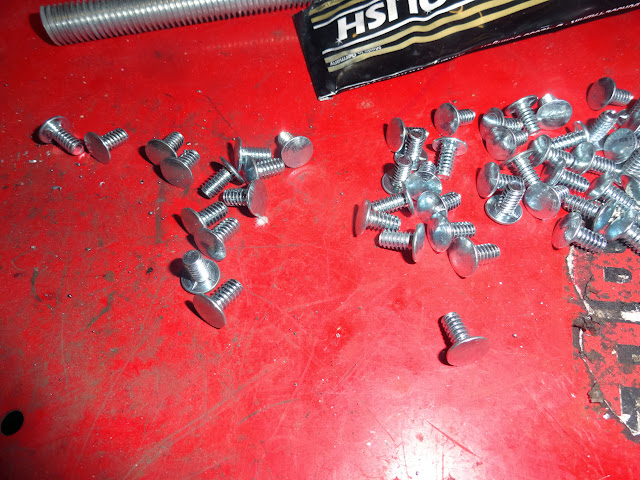
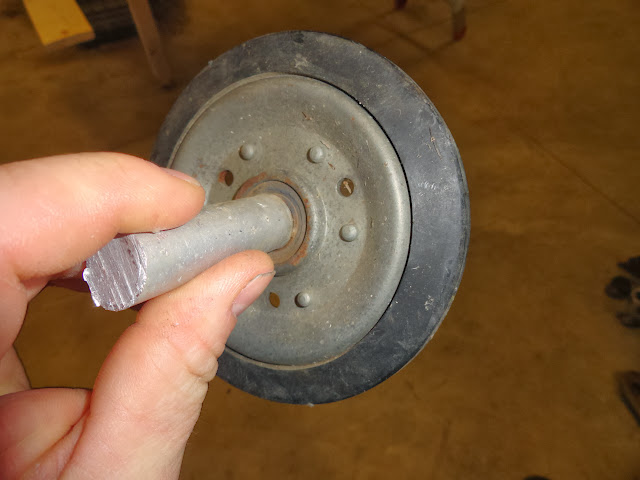
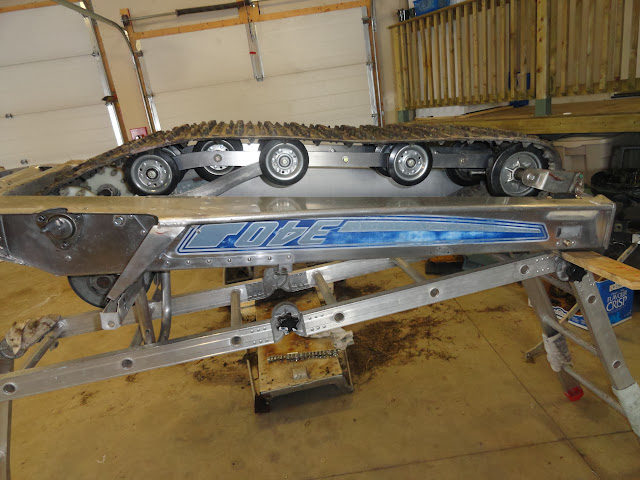
Well, I have the suspension done! Finally! It turned out pretty well I think. Everything on it took a fair amount of time. There were exactly three wheels out of the 30 I had that needed no service other than a little polish, the rest were all rusted on one side or the bearings were shot. I endmilled all the rivets off and punched them out so I could separate the halves. After a little digging around I found some neat fasteners with blind head that were used to put the wheels back together. They look cool and will be easier to take apart if any more bearings need to be replaced. Every shaft and spacer was replaced with new ones I made. The springs were blasted and painted and all new fasteners were used.
The little fasteners that were used on the wheels.
This is one of the wheels that was in OK shape. Many were rusted beyond saving.
The before...
The after... I ran out of nuts for the last 4 wheels. I'll have them finished and put on next week.

Installed. Yay!
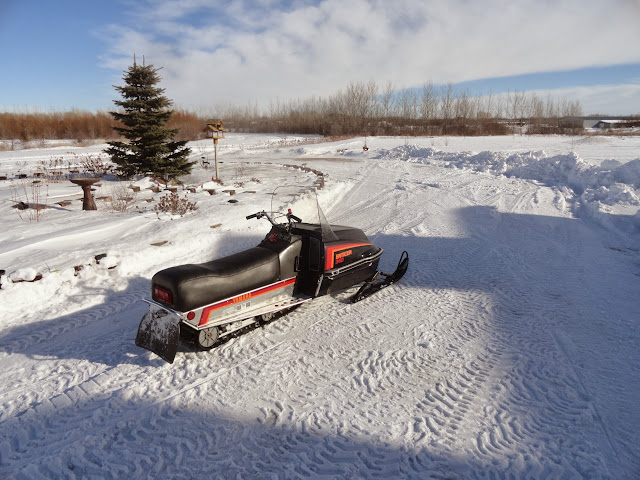
Well, it was too nice today to be working in the shop. We had the old ET out for some fun! I love this sled! ALWAYS starts and goes like a raped ape!
OK, I said I wasn't going to spend any time in the shop today, but I couldn't resist. I cleaned up the chain and sprockets and put them in. By the way, does anyone know which sprocket to use for the 440? The 18t or 19t? The parts manual lists both but does't say which was used on which engine. I installed the 19t.

Heres the beast. It's a disaster. The belly pan is a complete write off. Someone has done some renovations on the back of the tunnel as you will see in the photos. The seat is self explanatory. On the hand, the engine is whole, as is the rest of the drivetrain. The track is in rather remarkable shape and the hood is in one piece! I am on the fence as to what to do with this beast, part it out and toss the chassis or go ahead and repair the ass end while searching for another belly pan. The engine is a no brainer. I will start there and rebuild it top to bottom along with the carb. That's easy. Any suggestions? I live near Saskatoon, SK if anyone has any parts to offer. I get regular visits to and from Flin Flon if there is anything up north to be had.
Ok, I've torn down the engine and it looks ok for the most part. The piston and head on the pto side show signs of detonation but nothing major. I'm going to hone the cylinders and put in new pistons anyway. The clutch was a real pain to get off. I could not find specs or drawings or any kind of reference to a puller so I made my own. Its covered in grease because I had to fill the crank hole with grease to hydraulically get it to pop off. The 1.5in. nut on the clutch was in pretty tough shape so I whipped up a new one out of stainless. Should look nice when the rest of the clutch is rebuilt.
Ok, I have decided to use the 1980 as parts and get another sled. It is just too far gone. I am picking up another 1977 this coming Friday to use a base. I will use the 440 from the 1980 as a powerplant and the chassis from the 77. The hood from the 80 will be used as well as anything else that needs to be replaced. I havn't decided on a color yet.
Well I've been working on the engine. The flywheel was a little bit of a chore to remove. I tried the old universal puller method along with a little heat and some taptaptap on the end. It didn't budge. I didn't want to beat the heck out of the crank so I made a puller similar to the one in the Cuyuna service manual. The flywheel popped right off. Yes, that is blood on the puller. Don't ask.
Somewhere in the life of this overused motor some jackass had it apart because of a burnt PTO side piston. He replaced the nuts on a few of the studs with imperial fine thread nuts. They were all cross threaded and ruined. *sigh*
I made all new studs out of 5/16" stainless rod.
One of the exhaust studs was pulled right out of the casting and needed to be helicoiled. That wasn't so bad. I think the center seal on the crank is toast. Its fairly loose on the shaft. I was going to press the crank apart and put a new one on but I have no idea where to get one. Any thoughts? I have another crank from a 340 that should work but I won't know until I tear it down.
Ok, I got the old 340 torn down. The chassis is in pretty good shape with the exception of the skid plate for the chain case. Its kind of beat up but the one on the other sled is in good shape so I'll switch them out.
The belly pan is in not great shape. If I can't find another in reasonable shape I will attempt to repair this one. Does anyone know what kind of plastic this is?
Well, it's New Years Eve and I'm laying on the floor in the rec room watching the kid play vids. I havn't made much progress this week. The jugs are in for boring and will be ready on Thursday or Friday. I got the last set of pistons Rec Supply had on the shelf for a Cuyuna 440. I made new studs for the top end as well as a clutch puller for the old 340 so I can get at tearing it apart to retrieve the crank. I noticed a crack in the tunnel that needed welding so I decided to clean it up and see if there were any more. I find a few!! Nothing major though. It'll be going to my uncles shop for a little TIG treatment before reassembly. The best news I got this week was that stingerIII has a complete belly pan for me and maybe a few other goodies to help me along! Thanks stingerIII!!
The motor mounts have hairline cracks.
The biggest crack of all. Somewhere along the way something went up inside the tunnel.
Well, its not perfect but it's in pretty decent shape. Just a few dings here and there, most of which disappeared with the tap of a rubber mallet.
I have 2 cranks for the 440 and one had has good bearings and I hoped one would have a good center seal. The center seals on both are pooched. I have had no success finding a seal locally so I am going to use 2 single sided seals back to back as recommended by others. The good news is that the crank needs no repair other than the seal. I was worried that the shaft would need flame spraying in the center but its only worn in the seal area by 0.001. I'll press it back together and realign it this weekend I hope.
Finally got around to making some intake isolators. The old ones are no good as you can see in the pic.
Today was good and bad. The good news is that chassis is done with getting welded. The bad news is that I was looking at the cylinders and I noticed that one has a crack in it. I don't think I can get away with using it. What do you guys think?
The crank is finally done and realigned. I am glad I did this as there is no comparison between the old center seal and the new ones. It was a real learning curve putting it back together but now that I have done one the next won't give me so much anxiety. In the pic you can see the old seal behind the 2 new ones that replaced it.
Here is my take on a flow through head for the mag side. As far as I know Cuyuna never made one for the engines with the canted plug design but I don't see any reason this shouldn't work the same way.
I havn't posted in a while so here is the update. I had planned on starting reassembly by now but I have hit a little roadblock. Turns out both sets of my drive wheels are cracked, and not just a little. I am attempting to source some out close to me as I do NOT want topay US prices right now. Stupid dollar..... If I can't find some in decent shape I will manufacture my own. In the meantime I have made much progress cleaning and refurbing other parts. The chaincase being the worst. Pressure wash, soak in hot tank, repeat as necessary. I have never seen so much dirt/soil inside a machine. You could have planted a garden in this thing. I took apart the guages and cleaned and repainted the insides and needles as descibed here. I also rolled back the odometer as described in this video. The skid is another story. I thought it was in decent shape but someone must have damaged it badly and decided to "rebuild" it themselves. I'll post a pic of it later.
Here's the pararail out of the 77. Some one replaced most of the spacers with pipe nipples that had been cut to length with a hacksaw. Nice. I assume most of the axles are bent too. We'll see.
This spacers in this pic were replaced with some old steel pipe.
This one has another spacer on the outide of the wheel. I really don't know why.
Here is the suspension from the donor machine. It still has the stock spacers but needs new axles.
It took some doing but I got it apart. I'm going to make all new axles and spacers since I couldn't get most of them apart.
I think there used to be a heavy duty suspension kit offered for these sleds but I don't know what it consisted of. I'm no spring chicken anymore and the thought of making making new aluminum axles and having them bend again bothers me, so I made new axles and spacers out of stainless.
I got the swing arms cleaned up and noticed that the bronze bushings had shattered on the ends. They were pressed out and new ones were made along with new stainless spacers that ride inside the bushings.
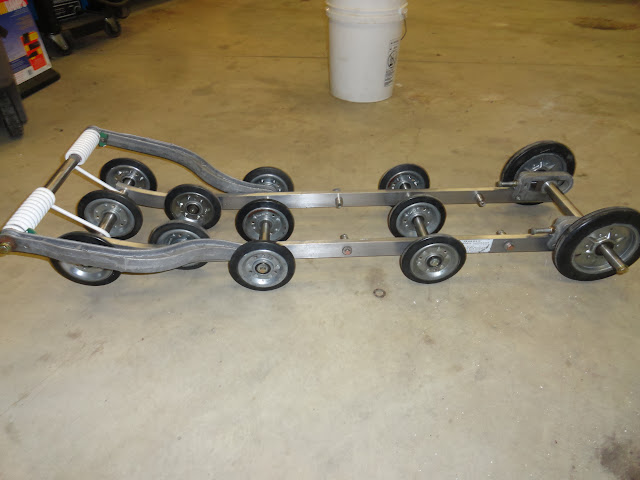
Well, I have the suspension done! Finally! It turned out pretty well I think. Everything on it took a fair amount of time. There were exactly three wheels out of the 30 I had that needed no service other than a little polish, the rest were all rusted on one side or the bearings were shot. I endmilled all the rivets off and punched them out so I could separate the halves. After a little digging around I found some neat fasteners with blind head that were used to put the wheels back together. They look cool and will be easier to take apart if any more bearings need to be replaced. Every shaft and spacer was replaced with new ones I made. The springs were blasted and painted and all new fasteners were used.
The little fasteners that were used on the wheels.
This is one of the wheels that was in OK shape. Many were rusted beyond saving.
The before...
The after... I ran out of nuts for the last 4 wheels. I'll have them finished and put on next week.
Installed. Yay!
Well, it was too nice today to be working in the shop. We had the old ET out for some fun! I love this sled! ALWAYS starts and goes like a raped ape!
OK, I said I wasn't going to spend any time in the shop today, but I couldn't resist. I cleaned up the chain and sprockets and put them in. By the way, does anyone know which sprocket to use for the 440? The 18t or 19t? The parts manual lists both but does't say which was used on which engine. I installed the 19t.